What is XVidCap?
A screen capture enabling you to capture videos off your X-Window desktop for illustration or documentation purposes. It is intended to be a standards-based alternative to tools like Lotus ScreenCam.
Video can be saved in MPEG or AVI files format.
XVidCap is the tool I use to do most of my screencapture works as it provides both flexibility and functionality.
How To Install It?
XVidCap is found in the Ubuntu repository. So, installing it is pretty straight forward:
$ sudo apt-get update$ sudo apt-get install xvidcap
XVidCap Features Explained
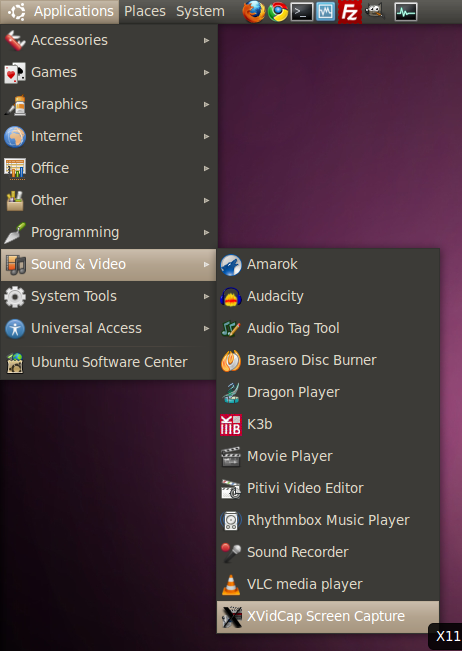
After installation, you will fing XVidCap under Applications -> Sound & Video -> XVidCap.
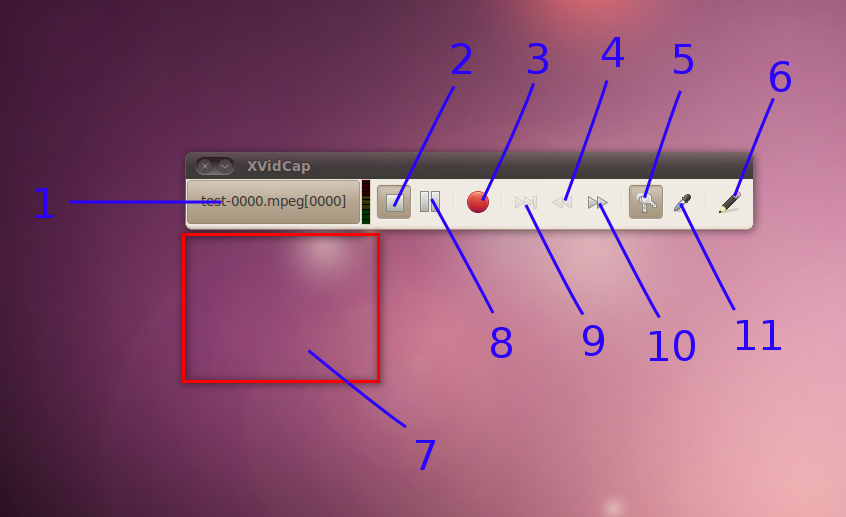
The image above shows XVidcap. Given below is a description of the various labels.
#1
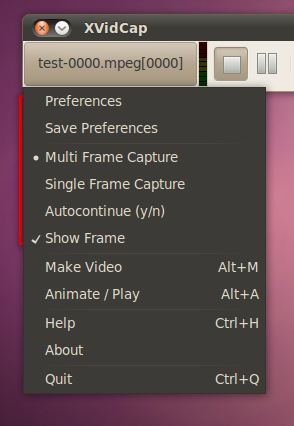
Right clicking on this brings up the menu. The menu is shown below:
From Preferences, you can set various options for capturing the screencap. We will come back to Preferences later.
Save Preferences, as the name indicates, saves the preferences you have set.
XVidCap has two modes: Multi Frame Capture and Single Frame Capture. You have to use Multi Frame Capture If you want to make a video. Single Frame Capture is saves the different frames as a series of pictures rather than as a video.
If you check Show Frame, you will see the red box(#7 in Picture 2) which indicates the area of the screen being captured. I would suggest that you keep it checked so that you know what is being recorded and what is not.
Preferences
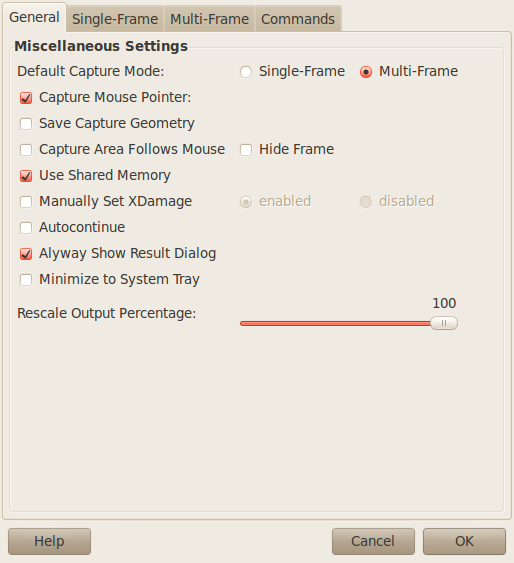
The Preference window has four tabs – General, Single-Frame, Multi-Frame and Commands.
Shown above is the General tab. We have already discussed Single-Frame and Multi-Frame above. Rescale Output Percentage sets the size of the video (width x height) as a ratio of the size of the selection area (#7 in Pic 2). Most of the other options are self-explanatory and I suggest you play around a bit to know what they do.
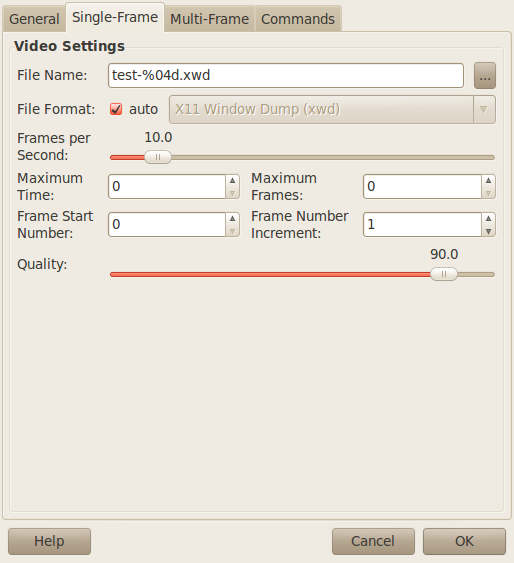
The Single-Frame Tab is shown above. The file is by default saved in your home folder. You can change the location and the filename if you want by changing the File Name field. To do this youcan enter the location manually or click on the button marked by the red box in the picture above.
The File Format field specifies the format of the output file. The formats supported are – .xwd, .pgm, .ppm, .png, .jpg. If you enable auto, .xwd will be choosen.
You can also set the number of frames captured per second through the Frames per Second. However, remember that higher values will result in more CPU usage and greater change of dropped frames.
The Maximum Time, Maximum Frames, Frame Start Number and Frame Number Increment sets the maximum time to record, maximum fremes to capture, the frame number to start recording and the number to increment the frame with.
Quality specifies the quality of the saved image.
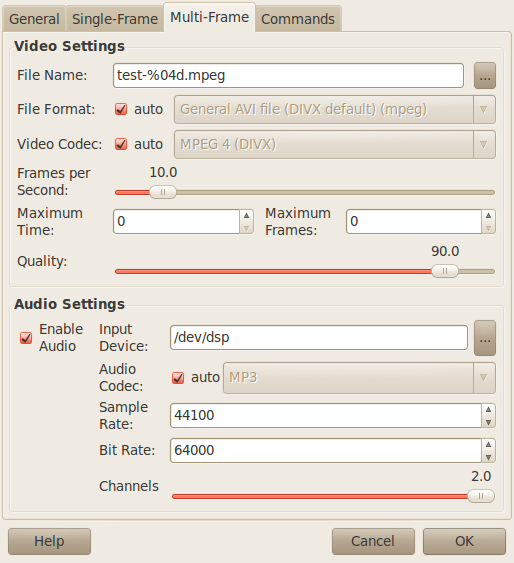
This is the Multi-Frame tab. Many of the options here are same as that in the Single-Frame tab. So we will only explain those features which are not there in the Single-Frame.
File Format specifies the format of the video file being used. The formats avi, asf, flv, mpeg, swf, dv, m1v, m2v, vob and mov. Enabling auto selects the default format mpeg. It is recommended that you use some common format like avi, mpeg etc.
Video Codecs defines the codec used for encoding the video.
Under Audio Settings, there is a field Input Device. Do not change this unless you know what you are doing.
The Commands tab specifies the commands that is to be execute to playback, encode, edit etc. If you are using Ubuntu Lucid, you will have PiTiVi installed by default and you would probably want to use it for for editing the video. To do this eneter the command below in the field for Edit Command:
pitivi "${XVFILE}" &Just like this you can enter custom commands in the diffrenet fields to play, edit etc.
#2
This is the stop recording button.
#3
This button starts the recording.
#4 & #10
These buttons are used to go to the previous frame and next frame in Single-Capture mode and previous video and next video in the Multi-capture mode.
#5
When this is active, the selection area (#7) is locked with the controls. When it is inactive, the selection area and teh controls can be moved independent of each other.
#6
Clicking on this button brings up the editor specified in the Comamnds tab under Preferences.
#7
This is the selection area. The screen capture is done of the area only inside this. You can resize the selection area by bringing the cursor to the red edge of the selection area.
#8
This is the pause recording button.
#9
This is used to record each of the frames manually. The frame is recorded when you click on this button. This button is active only when the recording is paused under Single-Capture mode.
#11
You can click on this and then specifies the selection area (#7).
How To Use It?
To make a screencast using XVidCap, start XVidCap. Right click on #1 and set the desired preferences. Then click on #11 and select the area to be captured. Then click on #3 to start the recording. Click on #2 when the recording is done.
