How To Set A Proxy In Google Chrome Separately? [Not Using Internet Explorer Settings]
 Google Chrome does not have any browser specific proxy settings. When you try to set a proxy in the Google Chrome browser, you are shown the system wide proxy - settings dialog, the one which is used by Internet Explorer to detect change in settings. For example, you won't be able to browse the Web using a proxy on Chrome (Find out how to make your own proxy) and on the Internet explorer directly as both have the same proxy settings dialog. In this article we will tell you How To Set A Proxy In Google Chrome Separately and Not Using Internet Explorer Settings panel.
For Windows
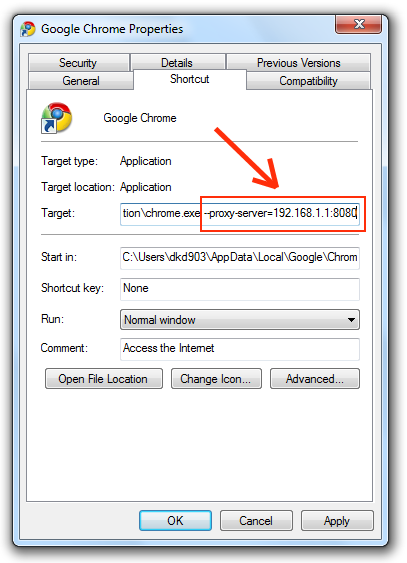
Step 1: Go to Chrome Browser's launch properties. This can be done in two ways: Right click on the Chrome icon on your Desktop and select properties or Right click on Chrome in the Start menu and click on properties.
Step 2: In the dialog box that appears, click on the "Shortcut" tab. Here, in the Target field - add the following for enabling a proxy separately in Google Chrome.
You can see this screenshot below for a better understanding of the steps as discussed earlier.

For Linux
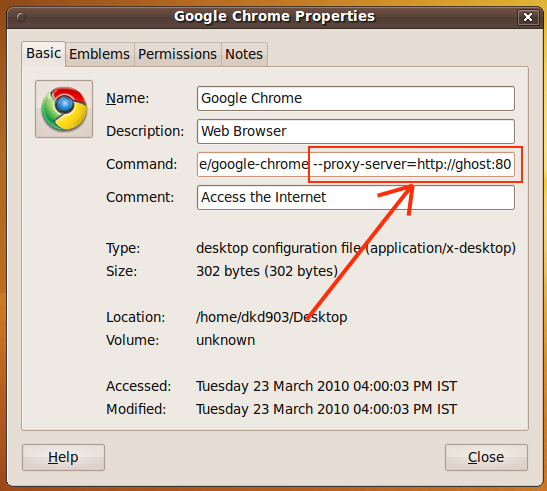
Similarly, for Google Chrome in Linux right click on the Desktop Icon or the Gnome panel Icon and click on properties. In the dialog box that opens, add this line before the %U in the command field.
You can see this screenshot below for a better understanding of the steps as discussed earlier.

You can find more network related command line switches for Google Chrome here.