
Woocommerce Attributes are a great way to additional features for your product listings on Woocommerce. You can use attributes to offer search filters or advanced search capabilities to your store.
Apart from these you can tag your products with various information like Colour, Size, Available Options, specific features, etc.
If you are looking for the code snippet right away, scroll down. It is generally a good idea to go through the matter below to get a thorough understanding of the entire process. If you are new to WooCommerce, you might want to take advantage of our Free WooCommerce Setup programme.
Before you can add or attach an attribute to a product in your Woocommerce setup, you need to make sure you have atleast one Attribute created.
You can do this both – programmatically or manually from the dashboard. Creating an attribute manually is in-fact faster in my opinion as you will not create many attributes.
Once you are done with creating attributes, you also need to add some possible values for your newly created Attribute. While this is not a necessity, you might want to do this just to maintain uniformity.
Adding or attaching an attribute to a product in Woocommerce involves two steps:
- First step is to use the wp_set_object_terms function to add a taxonomy term value to your product object.
- And the second step is to use the update_post_meta function to update the _product_attributes meta property of the particular product.
In Addition to this, we also need to find out what is the taxonomy corresponding to the newly created attribute. Taxonomies are nothing but a way to categorize things in WordPress. For instance, tags and categories are the default taxonomies in WordPress.
Step 1: Create an attribute from the WordPress dashboard.
You can access the Attributes manager screen from the left menu in wp-admin dashboard from Products > Attributes. You can also reach the Attributes manager by going to this link –
YOUR_DOMAIN/wp-admin/edit.php?post_type=product&page=product_attributes
Step 2: On that page, enter a name for your attribute. For eg. on an e-commerce website that I help run, we had to add an attribute named brand for exporting product feeds to various shopping engines.
Next choose the type as text from the dropdown.
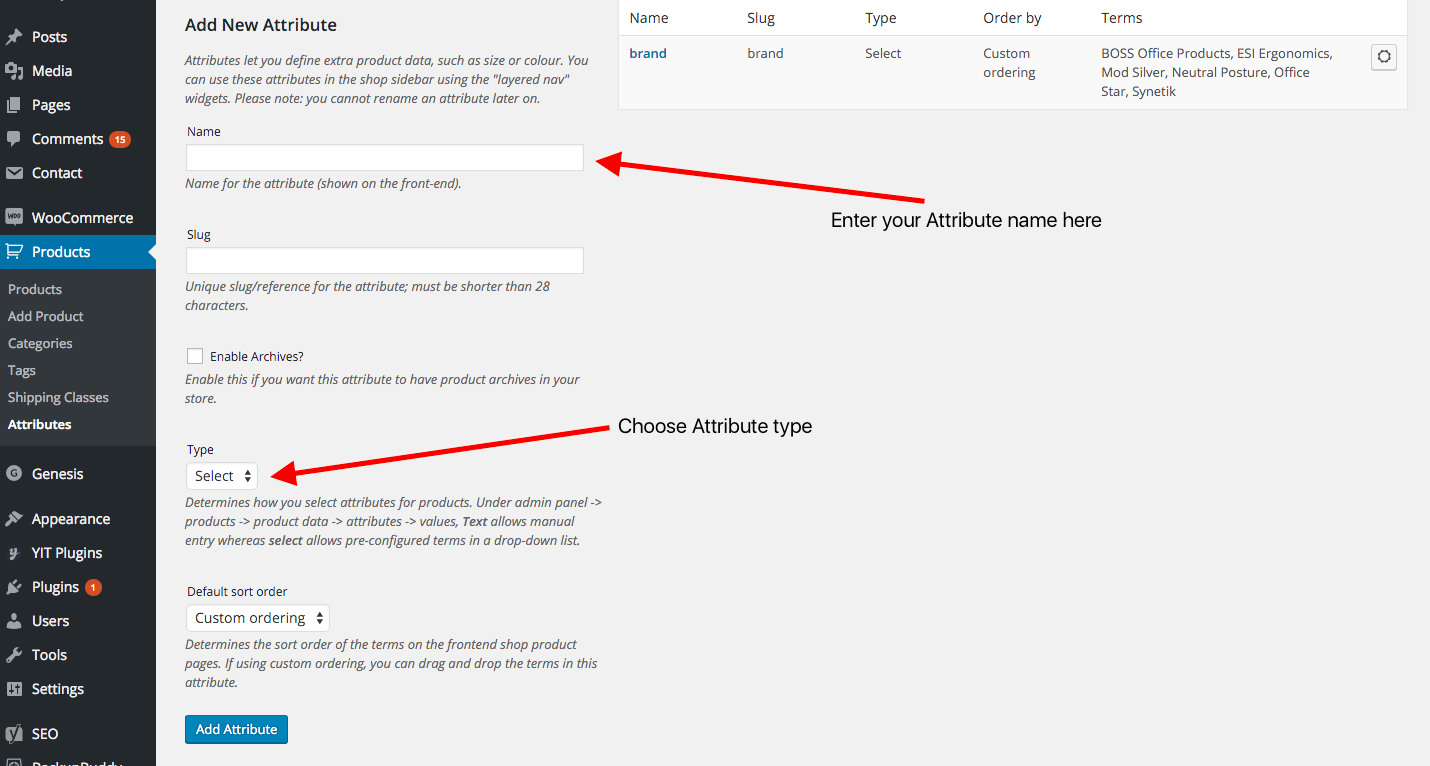
After you have created an attribute, you can see it in the list on the same page in the right side. In the above image you can see brand as one of the listed attributes that I created.
Step 3: This step is about finding out the taxonomy corresponding to the newly created attribute. If you have named your attribute size, then the taxonomy corresponding to the this attribute will be pa_size. For instance, when I created the attribute named brand for my e-commerce website, the corresponding taxonomy was pa_brand.
Rule of thumb: If the name of your attribute is abc then the the taxonomy corresponding to that is pa_abc.
Step 4: Here is the code snippet using which you can finally use to add attributes to one product or to multiple products. You have to place this piece of code in a wordpress query loop.
$term_taxonomy_ids = wp_set_object_terms( get_the_ID(), 'ATTRIBUTE_VALUE', 'pa_ATTRIBUTE', true );
$thedata = Array(
     'pa_ATTRIBUTE'=>Array(
           'name'=>'pa_ATTRIBUTE',
           'value'=>'ATTRIBUTE_VALUE',
           'is_visible' => '1',
           'is_variation' => '1',
           'is_taxonomy' => '1'
     )
);
update_post_meta( get_the_ID(),'_product_attributes',$thedata);
Example code: Let us say, you want to add a new attribute called Diameter with a value of 0.65m to all the products in your woocommerce store that are classified under the category named – “Living Room Light Balls”. Here is the code snippet for the same:
$target_products = array(
     'post_type' => 'product',
     'post_status' => 'publish',
     'product_cat' => 'Living Room Light Balls',
     'posts_per_page'=>-1
);

$my_query = new WP_Query( $args );

if( $my_query->have_posts() ) {

   while ($my_query->have_posts()) : $my_query->the_post();

     $term_taxonomy_ids = wp_set_object_terms( get_the_ID(), '0.65m', 'pa_diameter', true );
     $thedata = Array('pa_diameter'=>Array(
       'name'=>'pa_diameter',
       'value'=>'0.65m',
       'is_visible' => '1',
       'is_taxonomy' => '1'
     ));
     update_post_meta( get_the_ID(),'_product_attributes',$thedata);

   endwhile;
}

wp_reset_query();