Installing Homebrew on Mac OS X prior to El Capitan (that is Yosemite, Mavericks and others) used to be a breeze. But with a new change in OS X El Capitan called SIP – installing Homebrew has become a bit complicated.
You need not worry, I have got you covered.
There are two parts to this tutorial. If you want to uninstall or delete Homebrew first and then re-install it on El Capitan then follow Part 2 of this tutorial below. However, if you are doing a fresh installation of El Capitan then follow the steps outlined in Part 1 of this tutorial.
Happy Brewing!
Part 1: How to install fresh copy of Homebrew in OS X El Capitan
Step 1 – Install XCode by downloading it from here. This is needed for installing the XCode command line tools which in turn is needed by Homebrew. You might skip this step if you already have XCode installed.
Quick Note – If you already have XCode installed then go to STep 2. Also, You can skip this step and jump to Step 3 instead and see if the Homebrew installer complains about XCode command line tools. If it does, then come back to this step and continue.
Step 2 – Install Command Line tools by running the following command in terminal:
xcode-select --install
Step 3 – Now, you need to get a fresh copy of Homebrew and then run the install script. You can perform both these tasks using this one command in the terminal app:
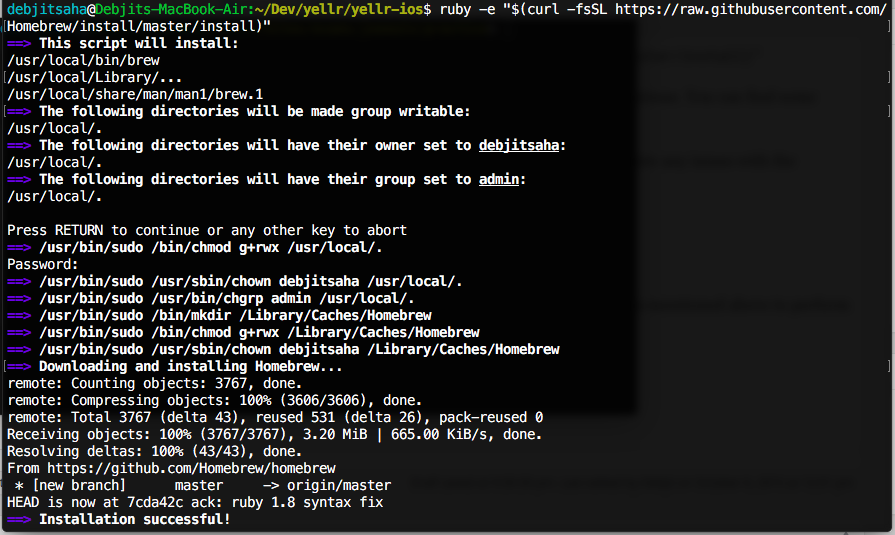
ruby -e "$(curl -fsSL https://raw.githubusercontent.com/Homebrew/install/master/install)"
If it complains about permission issues, then you have to fix it before you can continue. This is an additional thing that you need to do in Mac OS X El Capitan because Apple introduced this new feature called System Integrity Protector. Here is a guide to how you can fix this permission issue with Homebrew on OS X El Capitan.
After you have fixed the permission issue, re-run the command above in the terminal to begin the Homebrew installation process.
Step 4 – Run the Brew Doctor utility to check for issues or warnings in the terminal
brew doctor
If it shows errors, then you need to fix them before you can continue. You might, however, skip any warnings that the doctor tool shows.
All the apps and libraries that you install using Homebrew are located in this folder: /usr/local/Cellar
After Homebrew is installed, you can use some of the following commands to perform different tasks with it:
- You can search for an application using: brew search
- You can install a new application using: brew install <application-name>
- In order to list all apps installed by Homebrew, you can use: brew list
- For removing an app installed via Homebrew: brew remove <application-name>
- Homebrew can be updated using: brew update
- man brew will show other switches and command options for Homebrew.
Part 2: How to uninstall and re-install Homebrew in OS X El Capitan
Step 1 – First you will have to delete the Cellar folder of Homebrew that is usually available in the /usr/local folder. To do this, you need to run the following command in the terminal:
rm -rf /usr/local/Cellar /usr/local/.git && brew cleanup
Please note – If the above command throws a permissions error then you need to read this article to fix the Homebrew permissions in OS X El Capitan.
Step 2 – Install Xcode & XCode command line tools. This is an optional step but for many users, installing the tools mentioned in this step is mandatory. So in order to check, if you have to really perform this step, what you can do is quickly skip to Step 3 and run the command mentioned on that step – if you see success then you can safely skip this step, else continue here:
First download and install Xcode from this link – https://itunes.apple.com/au/app/xcode/id497799835?mt=12
Next, install Xcode command line tools by running the following command in your terminal:
xcode-select --install
If it complains about permissions, then use sudo and run the same command again.
Step 3 – Now that you have a cleaned-up Brew data folder, you need to fetch a fresh copy of Homebrew and start the installation process by running this command in the terminal:
ruby -e "$(curl -fsSL https://raw.githubusercontent.com/Homebrew/install/master/install)"
You might be prompted for your root password and when that happens, enter the password and continue. You can find some sample output towards the end of this post.
Step 4 – After the installation completes, you should run the doctor utility on brew to see if there were any issues with the Homebrew installation. This can be done by running the following command:
brew doctor
If it returns any error, try fixing them. If you see just warnings then you could ignore them.
At this point you have succesfully installed Homebrew on El Capitan and you can use the commands mentioned above to perform various operations.
Some sample Outputs: